System settings
On the System settings page, you have the ability to customise the settings for the registers and system, as well as download logs of user access.
Only users who have the Administrative permission Edit System settings can make changes to the System settings page.
About the System settings menu
Within the System settings menu, you have the ability to personalise specific platform settings and registers, along with managing your register menu setup lists. The System settings menu is grouped under the following lists:
-
General settings - These manage your platform wide settings
-
Core system menus - These manage the core Logiqc menus - Business area, Meetings, Positions
-
Register settings - This is where you manage specific register settings and your register menus. Only register that you have activated as part of your subscription will be visible.
-
*Response protocols - This is where you setup your response protocol lists.
-
*User onboarding email - This is where you can add relevant documents that will be attached to your user onboarding emails.
*These are paid addon features and will only appear in the system settings menu if they are part of your paid subscription.
To edit system settings
- Switch to Admin mode via your user account menu
- Select System settings from Administration menu
- Under 'Settings type, choose from the list
- Edit the required settings. Changes are applied instantly for most settings. In some cases you will be asked to click Apply.
- Return back to your user account by selecting Admin mode again
System Settings menus explained
Below are more detailed explanations of the system settings that you can make in the platform. For instructions on editing your setup lists, click on the following article:
Click on the system settings you wish to edit
- General settings
- Core settings
- Accreditation settings
- Asset settings - Workflow stages
- Contracts settings - Workflow stages
- Feedback settings
- Improvement settings
- Incident settings
- Repair settings
- Response protocols
- User onboarding email
Note: Some of the settings mentioned in this article relate to features that may not be available to you. The system settings that you have access to are based on the features included in your subscription. For information about any feature in this article that doesn't appear in your platform, click here and select the option 'I'd like to enquire about new features or registers'.
General Settings
| Setting | Purpose |
| User access log | The User log-on history link will download a .csv file to your local computer listing username; date and time; IP of workstation; Success/failure of logon; and Web browser type for every user log-on attempt. |
| Calendar integration |
A calendar can be created in your Calendar program (e.g. MS Outlook) that will display scheduled LogicQMS meetings. There are two methods of integrating user calendars with the LogicQMS Meetings Register:
Tip: Detailed instructions for calendar integrations are available via the following Knowledge base article: How to integrate meeting notifications into your calendar |
| Default to user's business area when reporting items | This relates to the Reporting registers only and will set the Business area menu to automatically default to the user’s business area when they are adding an item. The user can override the setting if required. |
| Default to user's manager when reporting items | This relates to the Reporting registers only and will set the Report to menu to automatically default to the user’s line manager when they are adding an item. The user can override the setting if required. A user’s line manager is configured in the user account of their manager. |
| Timeout |
There are two options you can select which applies to all users across the platform
|
| Enable links for files |
Selecting this option allows you to link to a file via a hyperlink instead of uploading a locally stored file. Applies to all file uploads in the Documents, Contracts and Records registers including Attached records.
|
|
Default files to links for new items |
This option will only appear if 'Enable links for files' has already been activated in your LogiqcQMS. If this option is selected, the default setting for attaching a file to a new item will be set to 'Link'.
|
|
Enable user provisioning through SCIM Enable SSO |
These options are displayed if your organisation has implemented Single Sign On (SSO) + User provisioning. These settings must be selected for this feature to work. |
|
Display slider option when setting severity scale |
This option allows users to set the severity rating of an event to set a rating score.
|
|
Enable 'Accommodation' field in Feedback, Improvement, Incidents, and Repairs |
This option will appear in the details page of the Feedback, Improvement, Incidents and Repairs register.
|
|
Five level severity assessment scale |
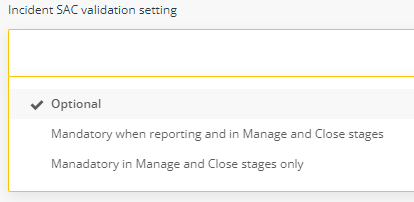
Enable a 5 level severity assessment matrix. Once active you can manage your settings via the Severity settings menu. Click on the following article to edit this feature: Severity Access Code (SAC) |
|
Site information |
These settings control automatic system behaviours such as the number of days before a document review date that the system will send a reminder task to the Document Manager. |
Core settings
These settings manage your Business area, Meetings and Positions menus which are a core part of the Logiqc platform architecture.
| Business area - Primary |
These two menus are linked together into a primary category and sub-lists. The primary list groups your organisation’s main areas of activity into separate business areas. For example, your corporate/admin areas could be represented like this: Corporate Services
|
| Business area - Secondary | |
| Meetings | List of the team meetings in your organisations which are accountable for monitoring tasks in your system. Used when adding any register item in the system. |
| Positions | List of staff position titles. Used when creating system user accounts. A single unique position title must be created for every user of the system. If there are multiple positions with the same title, each position should be numbered to remain unique. e.g. Nurse 1, Nurse 2 etc. |
Accreditation Settings
These settings are accessible if you have activated the Accreditation register and related features as part of your subscription.
| Setting | Purpose |
| Default standard | If your organisation has purchased more than one standard for the Accreditation Register, you can use this control to set which of the standards users will view by default when users navigate to the Accreditation Register. All users can navigate to other standards in the platform via the Filters panel. |
| Standard settings |
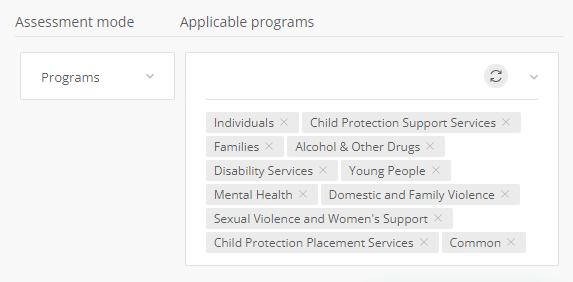
This setting is available if you have Multi-site Accreditation and/or Accreditation Programs addon activated. This allows you to set your Programs and/or sites for a particular standard. Multi-site:
Programs:
|
Asset settings - Workflow stage names
| Settings | Purpose |
| Workflow stage names | This menu is used to set up your workflow stages required to managed your assets. Learn more about setting up workflow stages |
Contracts settings - Workflow stage names
Note: This menu will only be visible if your organisation has the Contracts workflow builder addon activated.
| Settings | Purpose |
| Workflow stage names | This menu is used to set up your workflow stages required to managed your contracts. Learn more about setting up workflow stages |
Feedback settings
These settings are accessible if you have activated the Feedback register and related features as part of your subscription.
| Setting | Purpose |
| Enable two-level category menu | Switched on by default - Enables feedback to be coded under a primary and secondary menu structure |
| Enable controls to 'bulk send' notifications to all users and/or to all approval licence holders |
Allows users the option on the Feedback details form when selecting 'Notify users by email' to select all staff or all managers
|
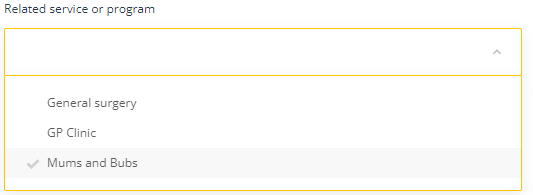
| Enable 'Related service or program' field |
Allows users to link the feedback or complaint to a relevant program within the organisation.
Note: Programs are added to the platform via the Setup lists admin menu under Related service or program. |
| Enable information requests |
Enables the Information request feature for Feedback and complaints. Click on the following article for more details: |
| Related region |
Reveals an additional drop-down menu in to link the Feedback to a related region. Once activated is managed under the Register menus drop-down menu.
|
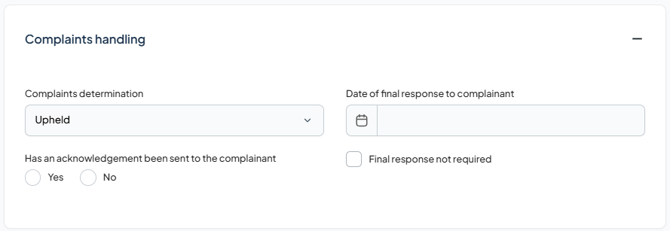
| Complaints determination and response date |
Displays component in the Manage stage to record details about the assessment of the complaint and communication with the complainant.
|
| Default viewing permission for complaints | This option allows you to set the Viewing permissions menu to default to a specific role/s automatically when a user adds a complaint to the Feedback Register. The menu will default to the selected setting if the user selects ‘complaint’ from the Feedback type menu. The user will be able to override the setting. This feature helps to mitigate the risk of accidental sharing of confidential material. |
|
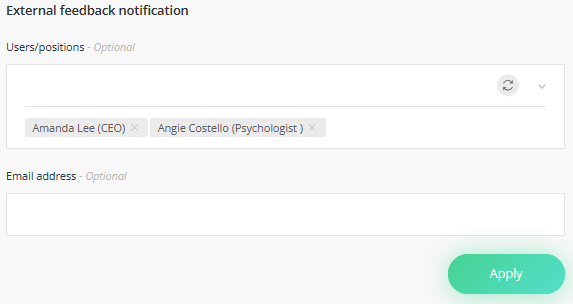
External feedback notification |
This component appears when Feedback register API to enable feedback to be reported by your customers and stakeholders via your company website. Select the users or positions in the Users/positions component to receive an email notification whenever external feedback is submitted. Use the Email address field when sending the email to users in an internal distribution list.
|
|
Email address |
If you have a team email for receiving complaints, you can add the team email here. This is an optional field. When feedback is reported through another platform, notification will be sent to this email as well as to the email accounts of those who have been selected in the field ‘Users/positions’. |
Improvements settings
These settings are accessible if you have activated the Improvement register and related features as part of your subscription.
| Setting | Purpose |
| Enable send to all staff and managers notification |
Allows users the option on the Improvements details form when selecting 'Notify users by email' to select all staff or all managers
|
Incidents settings
These settings are accessible if you have activated the Incident register and related features as part of your subscription.
Repairs settings
These settings are accessible if you have activated the Repairs register and related features as part of your subscription.
| Setting | Purpose |
| Enable send to all staff and managers notification |
Allows users the option on the Repairs details form when selecting 'Notify users by email' to select all staff or all managers
|
Response protocols
These settings are accessible if you have activated the Response protocols addon feature.
Click here for more information on setting up your Response protocols.
User onboarding email
These settings are accessible if you have activated the User onboarding email register and related features as part of your subscription. Click here or more information about this feature.
| Setting | Purpose |
| Documents to be sent as attachments to the user onboarding email | Allows you to select which documents from the Documents register you wish to attach to your User onboarding email, ie. Policy documents |


