
In this article:
Workflow Builder allows you to design your own workflow and business processes for contract and asset management. For example, you can specify the title of each workflow stage and the people who need to check the contract or asset prior to approval. LogiqcQMS will then automatically send the contract or asset from one person to the next, with no need to go back and forth from the manager.
This keeps responsibilities clear and gives each asset or contract a consistent path to approval.
Use Workflow Builder when a contract or asset needs several people to review, manage, or approve it in a defined order.
Each stage can have its own instructions and assigned user, so the item moves to the next person once the previous stage is complete.
Q: Does every workflow need an Approve stage?
A: Yes. The final stage is always Approve. It is assigned to the Contract owner for a contract or the Asset owner for an asset.
Q: Can a due-for-review asset or contract follow a different workflow?
A: Yes. Choose the stage where the review workflow should begin so the review cycle can start later in the sequence.
Before you start
Check the following:
- Workflow Builder is enabled on your platform.
- You are in Admin mode and have permission to set workflow stage names.
- You know who will be the Contract owner or Asset owner before you build the workflow.
Enable Workflow Builder on your platform
Workflow Builder is an add-on feature. If it is not already active on your platform, submit a request and a member of the Logiqc team will contact you about enabling it.
Need Workflow Builder? Submit a request to activate the add-on for your platform.
Step 1: Create workflow stage names
Switch to Admin mode from your user account menu, then open System settings.
Navigation path
Switch to Admin mode from your user account menu.
Open System settings.
Use the Settings type options to open the workflow stage names for Assets or Contracts.
Choose the register you want to configure:
- Assets: select Register settings, Asset, then Workflow stage names.
- Contracts: select Register settings, Contracts, then Workflow stage names.
Select Add label and enter a stage name, such as Budget review. Add the instructions for the assigned user, then select OK.
Repeat for each stage. When the workflow stage names are complete, select Save.
Step 2: Build an asset or contract workflow
When you add an asset or contract, select + Add stage in the Workflow section. Add the stages in the order they should be completed.
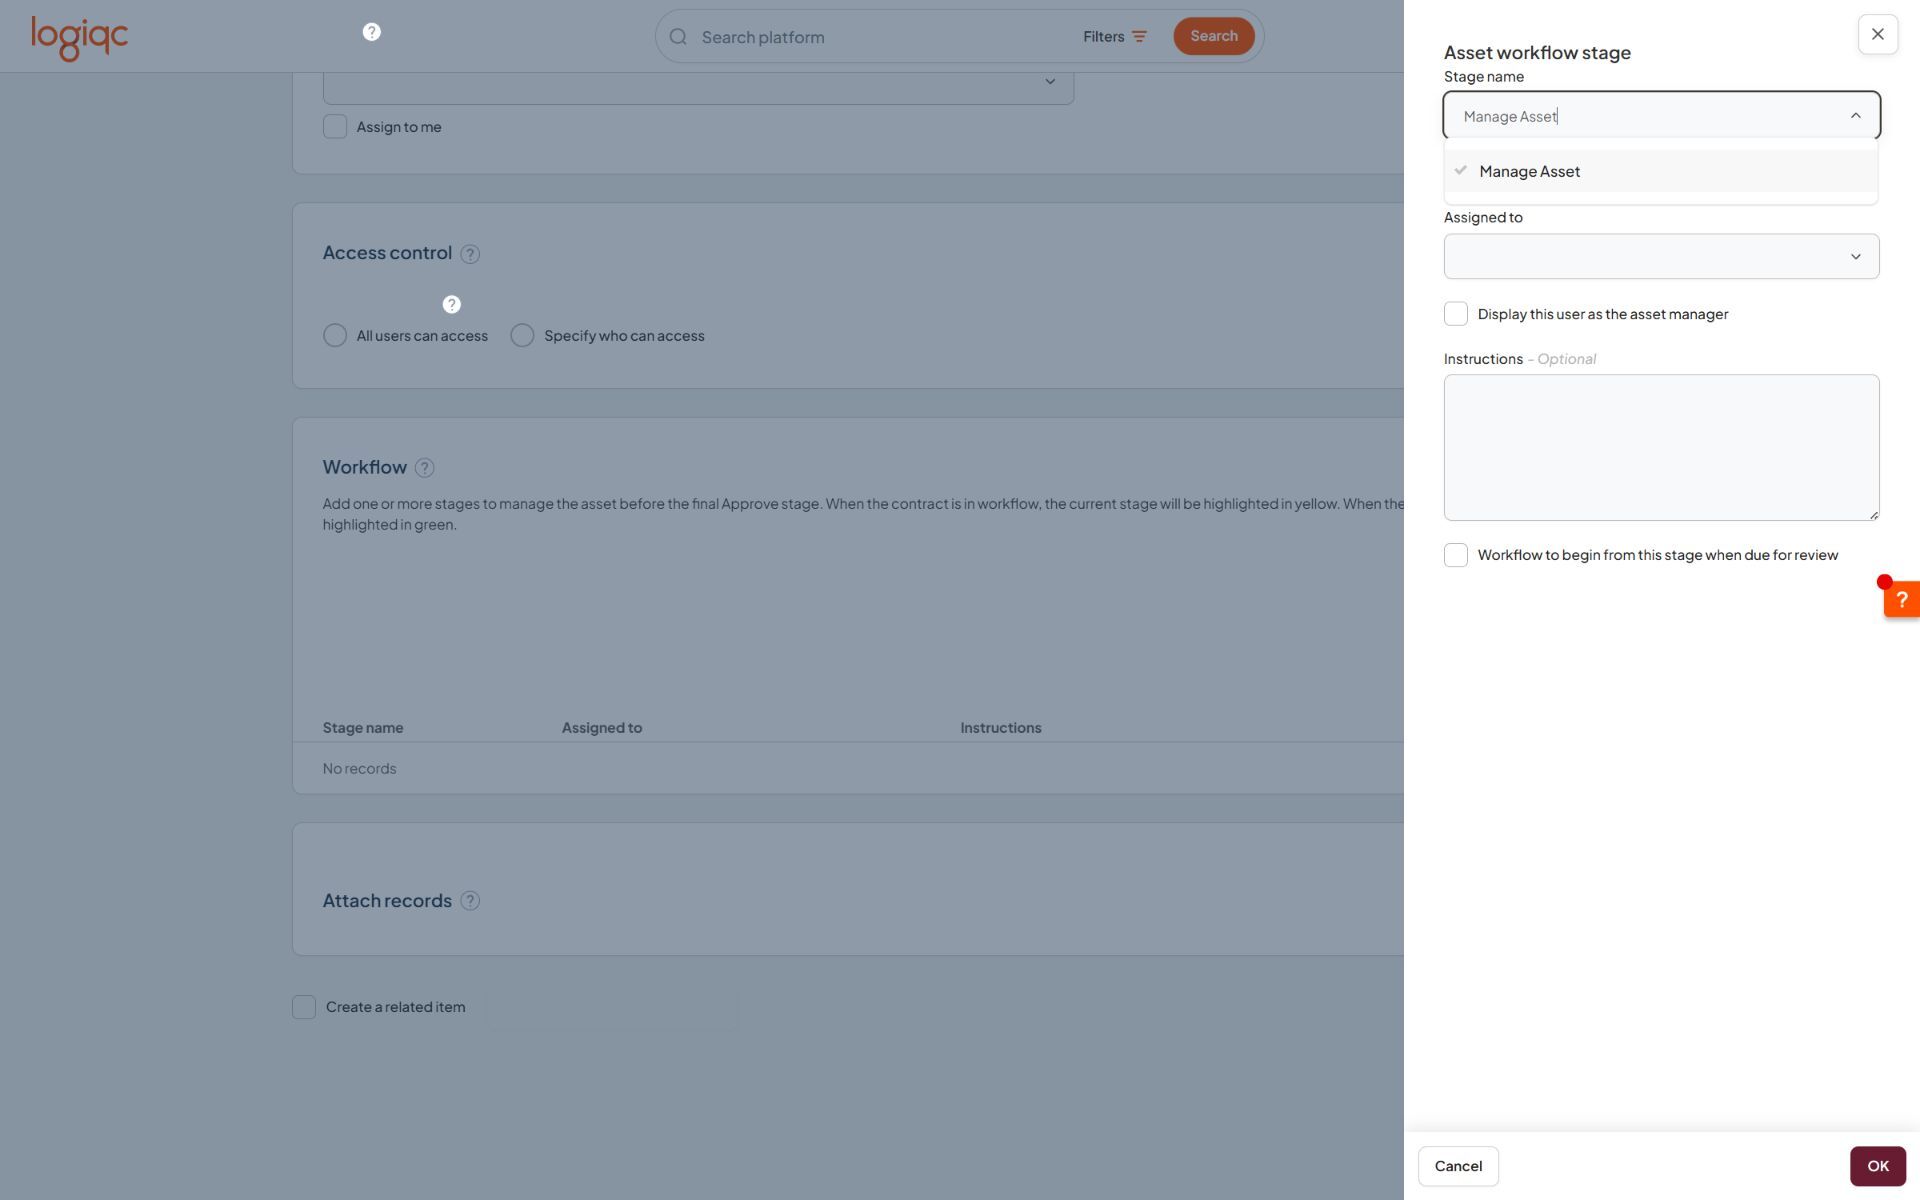
The Asset workflow stage panel is shown here. Contract workflows use the same fields, with Contract-specific manager labels.
Stage name: select a stage from the workflow stage names created for that register.
Assigned to: select the person responsible for completing the stage. They receive a notification when the asset or contract reaches them.
Manager: use the manager option to identify the person with overall responsibility for the asset or contract. This does not change the workflow sequence.
Instructions: review or edit the instructions shown to the assigned user.
Finish the workflow with the Approve stage. It is assigned to the Asset owner or Contract owner, and the person in the preceding stage can escalate the item for approval.
Step 3: Set the review workflow
If the asset or contract should follow a different sequence when it is due for review, select Workflow to begin this stage when due for review for the stage where that cycle should begin.
The review workflow follows the remaining stages from that point and finishes at the mandatory Approve stage.
What happens next
The item follows the sequence you set
Each completed stage sends the contract or asset to the next person in the workflow.
The item reaches final approval
The final Approve stage completes the configured workflow. For contracts, it is assigned to the Contract owner. For assets, it is assigned to the Asset owner.
To keep going, see: