Editing system menus
This article shows you how to edit the options that appear in the drop-down menus across the platform.
Note: Most of the menus in your system will be populated with default labels based on the broad industry sector your organisation operates within.
This article covers the following:
- Core and non-core menus
- System menus explained
- System menu types
- Editing your system menus
- Editing a single level menu
- Editing a double level menu
- About Incident menu mapping
- Setting the visibility for Feedback Type menu
Core and non-core menus
Your system comprises core menus and non-core menus:
- Core menus contain options entirely unique to your organisation and should be configured prior to any use of the system. The core menus are
- Positions
- Business Area
- Meetings
- Non-core menus relate to the specific registers activated in your system and are always populated with generic default options. While your system will operate without any change to these menus, the default options should be reviewed and tailored to suit your organisation and your filtering and reporting requirements. Below is an explanation of all system menus across all registers.
System menus explained
The table below lists all possible menus that can appear in your system. Menus are directly related to the registers and features activated in your system so some of the menus described below may not appear in your system.
Logiqc can import a customised list of menu labels that align with your organisations structure. To register your interest click here
|
Menu name |
Related register |
Description |
|
Accommodation |
Incidents |
List of supported accommodation sites where an incident may have occurred |
|
Accreditation assessment |
Accreditation |
Self-assessment ratings for standards. Used when rating your level of compliance against a standard. |
|
Accreditation business system |
Accreditation |
List of business systems in your organisation (e.g., IT systems). Used when creating an accreditation action task. |
|
Alarm activator |
Incidents |
Visible with the feature ‘Alarm raised component’ The feature appears in the Incident details form as ‘Alarm raised?’. When user selects ‘Yes’ an additional component appears – ‘Alarm details’ allowing the user to select a drop-down list of who activated the alarm e.g., Staff / Patient This is an additional feature of the Incident register |
|
Asset criticality |
Assets |
List of options describing the nature of your asset i.e. – Essential, non-essential. Used when adding an asset |
|
Asset depreciation method |
Assets |
List describing the method of an asset that has been identified as a depreciating asset i.e. – Diminishing value, Prime cost |
|
Asset location |
Assets |
List of areas/locations where your asset is located. |
|
Asset ownership |
Assets |
Describes the ownership of the asset i.e. – owned or leased. |
|
Asset type |
Assets |
List of asset types i.e. – Plant & equipment, medical equipment, vehicle. Used when adding an asset |
|
Asset region |
Assets |
List of geographical regions identifying where the asset is based. |
|
Asset category |
Assets |
List of categories used for grouping your assets |
|
Assets |
Assets Repair Incidents Maintenance |
List of asset items or asset groups. Used when reporting a repair, when describing asset damaged in an incident or scheduling maintenance. The list acts independently when the assets register is not activated. Once the register is activated, the list of assets is drawn from assets that have been added into the Assets register. |
|
Business area - Primary - Secondary |
All registers |
These two menus are linked together into a primary category and sub-lists. The primary list groups your organisation’s main areas of activity into separate business areas. For example, your corporate/admin areas could be represented like this: Corporate Services - Finance - IT - Admin - HR |
|
Compliance source |
Compliance |
List of drivers for compliance requirements. Used when scheduling a compliance task. |
|
Contact type |
Contacts |
List of categories for grouping the business contacts in the system. Used when creating a business contact. |
|
Contract category |
Contracts |
List of categories for grouping contracts eg Funding contracts, Supplier contracts, Employee contracts etc. Used when adding a contract to the system. |
|
Contract invoice task description |
Contracts |
List identifying the type of invoice being generated i.e. – Quarterly invoice Appears in the Contracts details form when Invoice task scheduling is activated. This is an additional feature of the Contacts register |
|
Contract invoice task type |
Contracts |
List identifying the type of invoice to be generated i.e. – Invoice or Credit note Appears in the Contracts details form when Invoice task scheduling is activated. This is an additional feature of the Contacts register |
|
Cost centre |
Contracts |
List of your organisations cost centres. Visible under ‘Financial details’ of a contract. This is an additional feature of the Contracts register |
|
Debtor code |
Contracts |
List of your organisation’s debtor codes. Visible under ‘Financial details’ of a contract. This is an additional feature of the Contracts register |
|
Document category |
Documents |
List of categories for grouping documents e.g. Policy, Form, Template etc. Used when adding a document to the system. |
|
Feedback information request type |
Feedback |
List of specific request types relating to the Information requests component eg Coroner's report, Police report, FOI etc. |
| Feedback Type |
Feedback |
List of main types of feedback eg Complaint, Compliment, Client feedback. Used when adding feedback to the system. |
|
Feedback category Feedback sub-category |
Feedback |
These two menus are linked together into a primary category and sub-lists. The Feedback category is the primary grouping of the Feedback types in the Feedback type menu e.g. Service provided |
|
Feedback source |
Feedback |
List of areas where customer/client/stakeholder feedback could come from e.g. Client, Patient, General community, Industry partner etc. Used when adding a feedback item to the system. |
|
Gender |
Incidents |
List of possible genders when recording a person involved in an incident. |
|
Improvement source |
Improvement |
List of areas where improvement opportunities or non-conformances could come from e.g. Client feedback, External audit, Internal audit, Incident etc. Used when adding an incident to the system. |
|
Incident area |
Incidents |
List of main types of incidents eg Clinical, Workplace Health and Safety, Operational etc. Used when adding an incident to the system. |
|
Incident category/sub category Incident type |
Incidents |
These two menus are linked together into a primary category and sub-lists. The Incident category is the primary grouping of the incident types in the Incident type menu e.g. Trips and falls Client fall Staff fall Used when reporting an incident. |
|
Incident injury location |
Incidents |
List of areas/locations when an incident (related to an injury) could occur. Used when reporting an incident and the user indicated that an injury has occurred. |
|
Incident injury mechanism |
Incidents |
List of options to identify the action, exposure, or event which was the direct cause of the most serious injury or disease. |
|
Incident injury type |
Incidents |
List of injury types eg contusion, sprain etc used to describe an injury. Used when reporting an incident and the user indicated that an injury has occurred. |
|
Incident location |
Incidents |
List of areas/locations where an incident could occur. |
|
Invoice area |
Contracts |
List of invoice areas in your organisation. Visible under ‘Financial details’ of a contract. This is an additional feature of the Contracts register |
|
Maintenance type |
Maintenance |
List of types of maintenance i.e., Service, Inspection |
|
Licensing type |
Licensing |
List of licensing checks which can be scheduled for users in the system eg Drivers licence, Working with children etc. Used when scheduling a licensing requirement. |
|
Meetings |
All registers |
List of the team meetings in your organisations which are accountable for monitoring tasks in your system. Used when creating any register item in the system. |
|
Person |
Incident |
List of person types users can select in the Persons involved component of the Incidents details form. Examples:
|
|
Positions |
Contacts |
List of staff position titles. Used when creating system user accounts. A single unique position title must be created for every user of the system. If there are multiple positions with the same title, each position should be numbered to remain unique. e.g. Nurse 1, Nurse 2 etc. |
|
Program |
Accreditation |
Name of funded programs to be assessed when using multi-program accreditation. |
|
Records Category |
Records All registers (when attaching a record to a task) |
List of categories for grouping records e.g. Report, Correspondence, Certificate etc. Used when adding a record to the system. |
|
Related service or program |
Feedback |
List of services/programs that a feedback item could be related to. |
|
Repair issue type |
Repairs |
List of main types of repairs or maintenance to be reported in your system e.g. Equipment failure, Facilities issue etc. Used when adding a repair to the system. |
|
Repair location |
Repairs |
List of areas/locations where the repair is required e.g. Staff room, Meeting Room, Workshop etc. Used when adding a repair to the system. |
|
Response protocols |
Incidents Feedback Repairs Improvement |
Names of protocols programmed for use with the Response protocols add-on. |
|
Risk category Risk name |
Risk Incidents Feedback Repairs Improvement |
These two menus are linked together into a primary category and sub-lists. The risk category is the primary grouping of the risks identified in your organisation e.g. Business continuity Disruption to essential services Hazard Biological Chemical Physical This list appears in the Risk Register when adding a risk to the register. It also appears in the Incidents, Feedback, Repairs and Improvement registers when the user chooses to link the issue being reported to an identified risk. |
|
Risk dimension |
Risk |
List of high-level dimensions underneath which your risk categories are grouped. Used when adding a risk to the system. |
|
Risk treatment option |
Risk |
List of mitigation strategies relating to a risk treatment eg Reduce the likelihood, Transfer the risk, Isolate the hazard etc. Used when assigning a risk mitigation action to a user. |
|
Site |
Accreditation |
Name of geographical sites (eg different clinic locations) to be assessed when using multi-site accreditation. |
|
Site information |
All registers |
These settings control automatic system behaviours such as the number of days before a document review date that the system will send a reminder task to the Document Manager. |
|
Supplier assessment criteria |
Suppliers |
Checklist of criterion used to assess preferred suppliers. Used when adding or reviewing a supplier. |
|
System failure type |
Improvement |
List of systems that can fail in the organisation which could lead to a non-conformance eg IT systems, Financial systems etc. Used when recording an non-conformance. |
|
Training type |
Training |
List of training events which can be scheduled for users in the system eg WHS training, Internal auditor training, First aid etc. Used when scheduling a training requirement. |
|
Workflow stage names |
Assets Contracts |
Workflow names to identify the workflow stage of a Contract or Asset. Examples:
|
System menu types
There are a variety of drop-down menus that appear in the Logiqc platform to assist the user to complete tasks quickly and consistently. There are two types of menus in the platform:
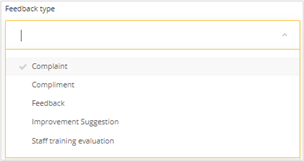
- Single level menu – where a single list is presented.
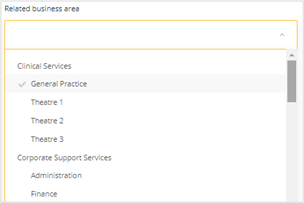
- Double level menu – where a categorised list is presented. Note: only the sub-categories are selectable.
Editing your system menus
Editing System menus requires administrative permissions. Learn more
To edit your system menus:
- Switch to Admin mode located under your user account menu.
- From the Administration menu, select System settings.
- Under Settings type, select the menu grouping you wish to edit (see table below for details on the menu groupings.
- Edit you system menus and save your changes. For details instructions on editing your menus, refer to Editing a single level menu and Editing a double level menu, located in the next section of this article.
The system menus are grouped as followed:
| Core System menus |
Register menus
|
| Register settings - Accreditation |
Register menus
|
| Register settings - Asset |
Register menus
|
| Compliance |
Register menus
|
| Contact |
Register menus
|
| Contracts |
Register menus
|
| Documents |
Register menus
|
| Feedback |
Register menus
|
| Improvement |
Register menus
|
| Incident |
Register menus
|
| Licensing |
Register menus
|
| Maintenance |
Register menus
|
| Records |
Register menus
|
| Repair |
Register menus
|
| Risk |
Register menus
|
| Suppliers |
Register menus
|
| Training |
Register menus
|
Editing a single level menu
Most menus in the platform do not allow the label to be changed, instead labels are either added, disabled or removed. Note: Lists can be exported to Excel for the purposes of collaboration with colleagues.
- Switch to Admin mode via your account menu
- Select System settings from the Administrator menu
- Under Settings type, select the menu group you wish to add or edit the system menu labels.
Tip: By default inactive labels are hidden, so toggle on 'Show inactive' to ensure you can view the disabled menu labels. This will also prevent duplicates being added.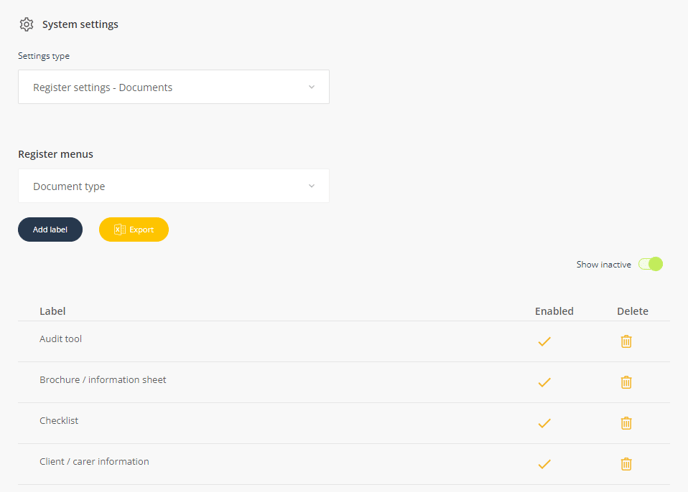
- To delete a menu label, click on the trash can icon. Note: If the label has been used or it is a core system label, you won't be able to delete it. You will have to disable it.
- To disable a menu label, click on the tick and it will change to a cross. You will be able to see it if you have toggled on 'Show in active'. To re-activate a disabled menu, simply click on the cross (X), and it will appear as active.
- To add new menu labels, click on Add label, enter the name in the Label text box and click OK.
- To save all your changes, click Save at the bottom of the menu label list.
Editing a double level menu
Editing System menus requires administrative permissions. Learn more
The following menus are double level menus:
- Business area - Primary and secondary (Core system menu)
- Feedback type (linked to Feedback category)
- Incident type (linked to Incident category)
- Risk name (linked to Risk category)
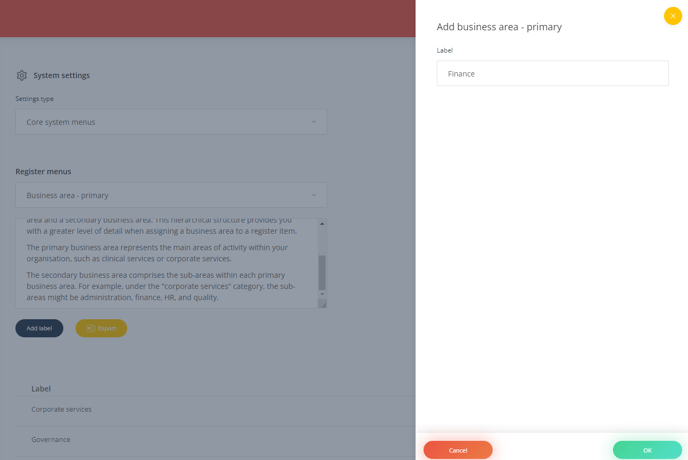
In the example below a new primary and secondary business area is being added to the Business area menu:
- Switch to Admin mode via your account menu
- Select Setup lists from the Administrator account
- Select Business area – primary from the Setup name
- Click Add label, type the name of the business area, and click OK.
- Click Save.
- Now go to the Business area – secondary The primary label will be displayed and a secondary label ‘All’ will have been created automatically.
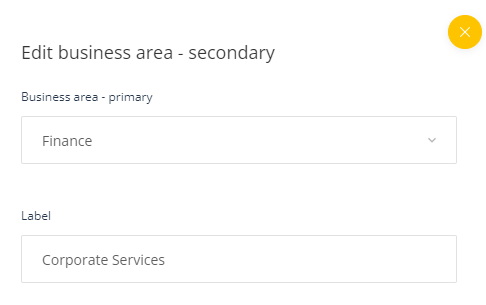
- Click the Edit icon next to your new label and rename the label from ‘All’ to the required sub-category. Click OK
- Click Save and refresh the browser to apply the change across the platform.
- The result will be a primary category and a secondary category in the menu eg:

About the Incident menu mapping
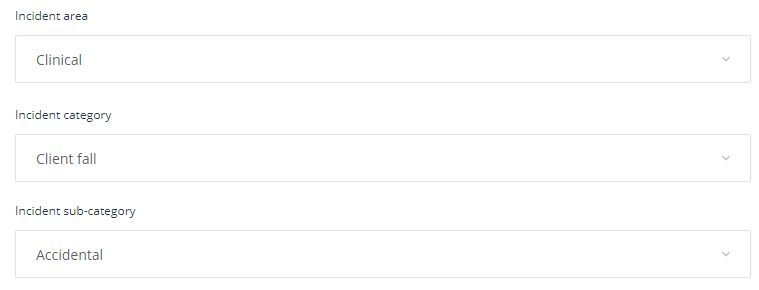
When reporting an incident, the user will first select the Incident type and then categorise the incident using these three relational menus:
- Incident area
- Incident category
- Incident sub-category
The options in these three menus can be linked to assist the user by narrowing the options presented as users make their selections. For example, when the Incident area is chosen, the Incident category menu only displays options related to that area and, in turn, when the Incident category is chosen, the Incident sub-category menu only displays options related to that category.
Setting the Incident menu mapping
Editing System menus requires administrative permissions. Learn more
- Switch to Admin mode via your account menu.
- Select System settings from the Administrator menu.
- From 'Settings type, select Register settings - Incident.
- Select Incident sub-category.
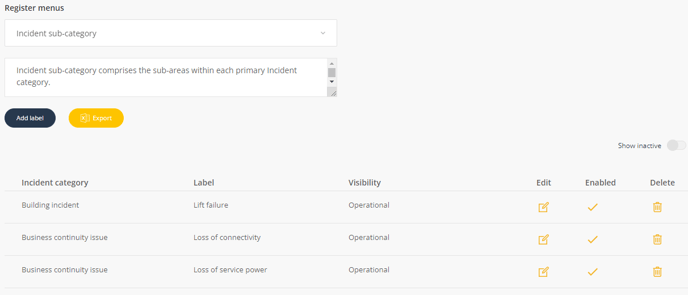
- Click on the edit icon
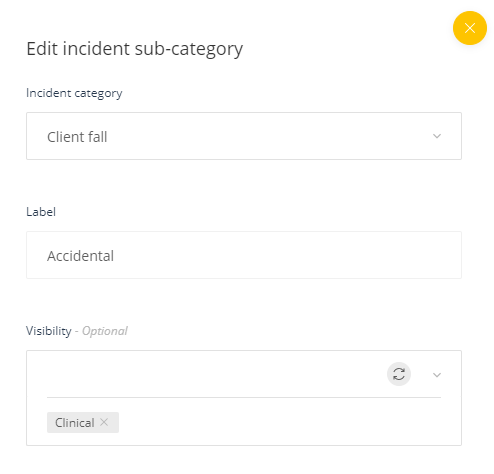
- In the Visibility drop down menu, select the incident area you wish to link the incident category & sub-category (label) to. In the example below, the incident sub category ‘Accidental’ will appear as an option when the user chooses the Client fall category under the Incident area 'Clinical'.
- Click OK, then Save.
Note: The Incident area menu can only be changed by Logiqc. If you wish to make changes to your Incident area, click here to log a ticket with Logiqc support.
Setting the visibility for Feedback Type menu
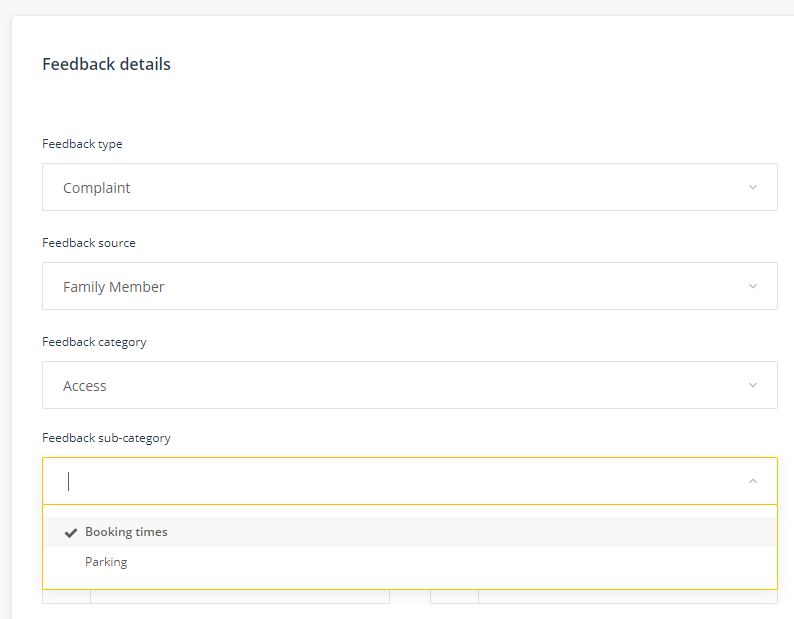
When reporting feedback, the user will use three menus to categorise the nature and type of feedback. The three menus used to categorise feedback are:
- Feedback type
- Feedback category
- Feedback sub-category
The options in these three menus can be linked to assist the user by excluding menu options which are not relevant to what is being reported. For example, when the Feedback type is chosen, the Feedback category menu only displays options related to the area. In turn, when the Feedback category is chosen, the Feedback sub-category menu only displays options related to the category.
To set the visibility
Editing System menus requires administrative permissions. Learn more
-
Switch to Admin mode via your account menu
-
Select System settings from the Administrator menu.
-
From 'Settings type, select Register settings - Feedback.
-
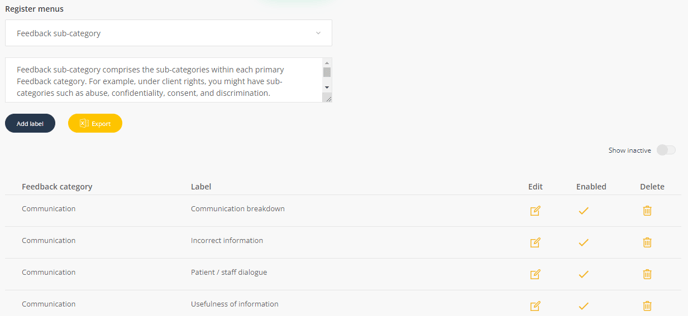
From the Setup item drop-down menu, select Feedback sub-category
-
Click on the edit icon
-
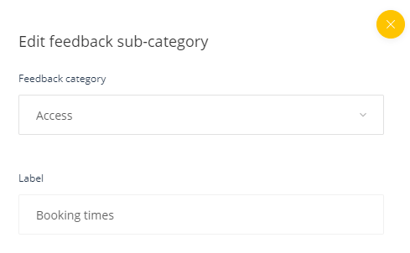
In the Visibility drop down menu, select the feedback category you wish to link the feedback sub-category (label) to.
-
Click OK, then Save.