What is feedback?
Consumer feedback is the information, insights, issues, and input shared by your community about their experiences with your organisation and the services you provide. Feedback can be positive (e.g. compliments or suggestions) or negative (e.g. complaints).
Why report feedback?
Recording consumer feedback guides improvements of the customer experience and can empower positive change in your organisation — even (and especially) when it's negative.
In most organisations, reporting and responding to complaints is mandatory and there can be many specific requirements for how complaints should be handled. Reporting feedback also drives decision useful trend reports which are available in the Analytics section of the platform.
Permissions required to report feedback
You will need the following permission to report feedback:
- Report feedback (minimum licence type required - Read Report)
How to add feedback
Click on the create button and select Feedback to add feedback. Then follow the instructions in each of the sections below:
![]()
-
Feedback details
Describe and categorise the feedback or complaint that you're reporting. - Persons involved
List the people involved in the feedback eg. the complainant or person providing the feedback. - Identified issues and improvements
Propose corrective actions and improvement opportunities. - Assign
Assign the event to someone to manage and notify other people who need to know. - Access control
Set who can view the report. - Attach records
Upload files or add links to records related to the event. - Submit your report
- System event history
A chronological record maintained by the system detailing entries and changes made to the form including links to any related items created by users
Feedback details
This component enables you to describe and categorise the feedback and record contact details of the feedback provider.

Feedback Type
Choose the type of the feedback being reported eg , 'Compliment ' or 'Complaint'.
Feedback source
Select the source of the feedback, eg 'Client', 'Community member', 'Service delivery partner', or 'Supplier'. Note: The primary purpose of the Feedback register is to record feedback from external stakeholders. It's not designed for internal staff-related claims.
Feedback category and sub-category
Select the primary category that best defines the feedback. This will reveal an additional sub-category menu where you can select a more specific category for the feedback.
Date and time
Please indicate the actual or estimated date and time the feedback was received. The date field will automatically display 'today's' date, but you will need to fill in the Time field manually.
Details of person giving the feedback (optional)
Tick this box to open additional fields to record the contact details of the person who provided the feedback (not the person recording the feedback ).
Feedback details
Describe the feedback eg. 'We had to cancel the appointment because the waiting time was too long' . You can add up to 2000 characters (300-500 words). Use the Additional comments field to add further information or upload or documents, emails, or photographs using Attach records.
Immediate action taken
Describe what action you or others took when the feedback was received. For example, 'I thanked the client for their feedback and advised them that it would be entered into our system and they should receive confirmation within 24 hours'.
Persons involved
In this section you can enter the details relating to each person involved in the feedback or complaint.

Click on Add and enter the details for a person involved with the feedback or the person making a complaint and click OK. This process can then be repeated to enter multiple people. Each person listed will appear as separate line items on the Persons involved tab on the Feedback register which can be searched and filtered for generating reports.

Person type
Chose the category the best describes the person and their relationship to your organisation.
Name
Type the name of the person. Note: This field becomes optional if an ID# is entered. This can be useful if strict privacy conditions are appropriate.
Gender
Select from the available options.
Ethnicity
Select from the available options. Note: Start typing in the field to activate progressing search. You can search on item or item code.
Date of birth (optional)
If required, record the person's date of birth.
ID#
Type the ID# of the person if this is available and required. Note: This field becomes optional if a name is entered. This can be useful if strict privacy conditions are appropriate.
Workplace (Optional)
Record the workplace or organisation the person is associated with if this is relevant or if the person is providing the feedback as a representative of an organisation.
This person provided the feedback (Optional)
To identify specifically who provided the feedback who lodged the complaint, select this box.
Add contact details (Optional)
For each person added, you can also include their contact details

Identified issues and improvements
Click Add to list corrective actions that should be taken as a result of the event. Corrective actions should be coded as a 'non-conformance' in the Improvement type field.

When you submit the entire repair report, the corrective actions and improvements created here will automatically appear in the Improvements register and be assigned to the relevant person to be managed.
If you have the permission to 'Edit closed items', you can use this component to create new improvements even after the item has been marked as closed.
Assign
This component is where you will specify who the feedback is reported to and which business area the feedback relates to ensure delegations and communication relating to the management of the feedback aligns with organisational requirements.
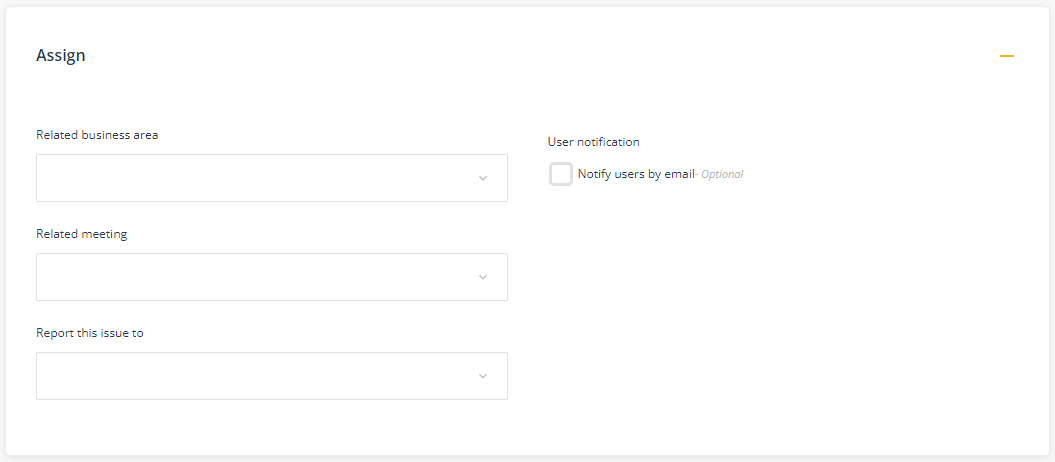
Related business area
Select the business area in your organisation that the issue relates to.
Related meeting
Select the team meeting responsible for monitoring the management of the issue. This will automatically place the report on their meeting agenda.
Report this issue to
Select who is responsible for managing this type of issue. Only users with permissions to manage repairs will be displayed. The user selected will be notified immediately of the issue and will be assigned the task to manage it.
If you will be the person managing the issue and you have the required permissions, select Assign to me. The Submit button will change to Next allowing you to advance directly to the next stage to manage the issue.
Notify other users by email (optional) - Select who needs to receive an email notification about the issue.
Note: Users sent notifications relating to the incident will need to be included in Access control to see the repair report.
Access control
The Access control component is where you define which users have access to view the item. You can grant access to a team or individual users, or both.
Note: In some cases, these fields may be pre-populated by business rules created by a system administrator.

All users can access
Select this option if you would like all users to be able to view the item.
Specify who can access
Select this option to control which users can view this item.
Teams
Select the team/s who need to view the item.
Individual users
Select specific users (if they are not included in the selected team/s) who need to view the item.
Who can view?
Click this button to see a list of users who can see the item based on your selection. The list will also include those users assigned to the item in the workflow. Note: Users with system level permissions to see all items will also be included.
Attach records
This component enables you to attach records relating to the issue such as correspondence, emails, or photographs. Only users with permissions to see the item will be able to see attached records.
Click Attach to add a record.

Record name
When naming the record ensure the description is meaningful. For example, 'Email from client re. final outcome'.
File or Link
Click on Choose file and navigate to the record on your computer. If you have links enabled, toggle to change the control to add a URL to the record. The URL must be a in a web format (https://) or Microsoft Sharepoint format (https://<company>.sharepoint.com/...)
Submit or save as draft
The green Submit button will save the form and progress the item to the next stage of the workflow. After an incident is reported, it will progress through a series of workflow stages for management, response, and eventual closure. Learn more about workflows.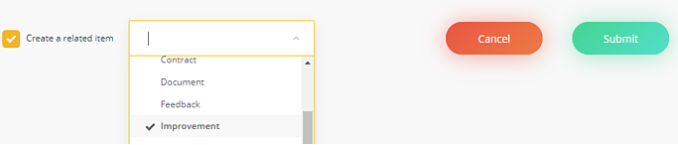
Select Create a related item if you want to create a separate linked item on another register when you save the form. A link between the two items will be displayed in each item's System event history. This may be useful when you want to suggest an improvement in response to the feedback.
Saving a report as a draft
- Complete the Description field. You must fill in the Description field at a minimum. The remaining fields on the form can be completed later before you submit the item.
Note: Business rules are applied to draft items so a number of fields may be automatically populated as you complete the form. This will not affect your access to return and complete the draft. - Click 'Save as draft' located at the bottom of the form. Users you specify in the ‘Report to’ or ‘Notifications’ fields will not receive any notification of a draft item.

Accessing your draft report
- Once saved, your report will appear in the Draft tab on the register. You can find this tab when viewing the register.
- For quick access and as a reminder of incomplete reports, links to your draft items are displayed in the Drafts notification button in the header bar, located at the top-right section of your platform.
Submitting your draft report
Open your draft report and complete the required fields including any relevant attachments. Then click Submit to send your report to the person you’ve specified. Any additional email notifications to people you’ve specified will also be sent at this time.
System event history
A chronological record maintained by the system detailing entries and changes made to the form including links to any related items created by users.
Click the '+' control on the right to expand the line item to see more information.
