To create a meeting
Note: You need the admin permission Edit system settings to add Meetings.
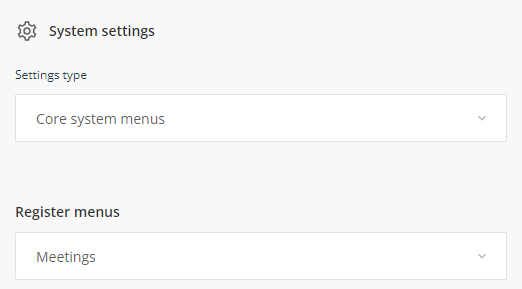
- Switch to Admin mode via your user account menu.
- Select System settings under the Administration menu.
- Under Settings type, select 'Core system menus' and under Register menus select Meetings.
- Select Add label
- Name the meeting
- Click OK - The meeting will appear in the Meetings list. Repeat to add additional meetings.
- Once you have added your meetings, click Save at the bottom of the Meetings list window.
To Edit, Enable/Disable, Delete meetings
The control buttons allow you to edit, enable/disable or delete.
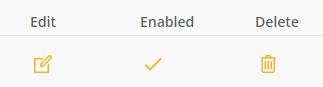
To edit, scroll down the list of added meetings and click on the edit icon, make your changes and click OK. Click Save at the bottom of the meeting list window.
To disable, scroll down the list of added meetings and click on the tick. The icon will change to a cross 'X'. Click Save at the bottom of the meeting list window.
To enable, click on the X and the icon will change to a tick. Click Save at the bottom of the meeting list window.
To delete, scroll down the list of added meetings and click on the trash can icon. The meeting will be removed. To save this change, you will need to click Save at the bottom of the meetings window.
Once the meeting has been created, you are now ready to add a meeting schedule and add participants. The following article explains how to do this. Scheduling a meeting