Why did I get a task to manage feedback?
A task will be assigned to you when new feedback is reported directly to you or when a task you previously delegated to someone else has been completed.
What do I need to do?
Check the Action history for any notes about what's been done to date. Then decide if further action is needed or if the item is ready to be closed.
Learn how to do this in the Task management section below.
Permissions required to manage feedback/complaint
You will need the following permission to manage feedback/complaint:
- Manage Reporting register items (minimum licence type required - Approval)
In this article
Click a link below to learn more about each section of the Manage form in Logiqc.
- Feedback summary
Describes the feedback reported and the immediate action that has been taken. - Action history
A list of actions taken at each stage of the workflow, along with any comments provided by users. - Response protocols
List of actions created using the Response protocols feature and their current status. - Task management
Your options for managing the feedback. - Severity assessment (Complaints only)
Assign a severity level. - Risk-linkages (Complaints only)
Link the issue to a relevant risk on the Risk register. - Complaints handling (Complaints only)
Record information about the management process such as date of final response to complainant. - Identified issues and improvements
Key information about the people managing the standard. - Attach records
Upload files relevant to the event such as correspondence, emails, or images. - Submit or save
Complete your task and submit the form - System event history
A chronological record maintained by the system detailing entries and changes made to the form including links to any related items created by users.
Feedback summary
This component displays the description of the feedback and the immediate action taken when the complaint was received.
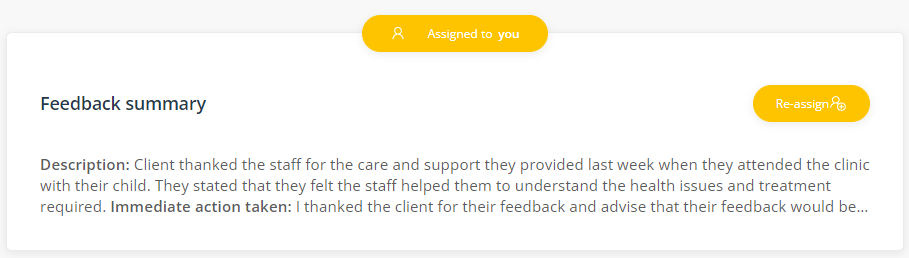
Click Assign to you to go to the Task management component. If the feedback should be managed by someone else, and you have the required permissions, click Re-assign to transfer the item to another user.
Action history
This component displays instructions, actions taken, progress notes and comments made to date as the item has progressed through the workflow.

Hover over the date to display who recorded the note.
Go to topResponse protocols
List of actions created using the Response protocols feature and their current status. 
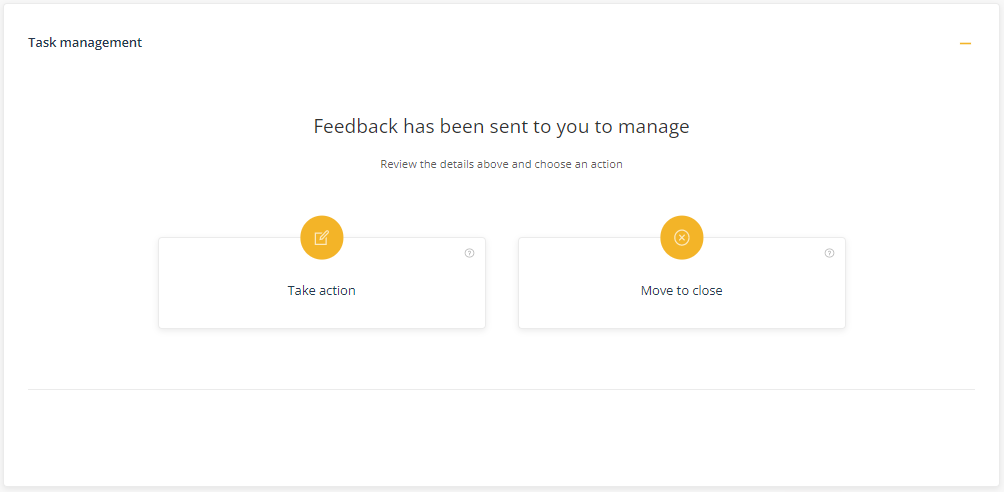
Task management
This component displays the two options you have to manage the feedback.
Note: The options will be different if the Response protocols feature is activated in your platform. This feature is an add-on for the Feedback register designed to save time when delegating action by providing access to a menu of built-in instructions to choose from. In setting up the controlled actions, date rules can be pre-set to ensure critical timeframes are followed eg 'send acknowledgement letter to client within 3 days of receipt'.
Click here for instructions about using the Response protocols feature.
Task options
Assign a task
Choose this option to define and delegate the tasks required to respond to the feedback.
- Task instructions - describe what needs to be done to respond to the issue.
- Assign to - select the user responsible for carrying out the task. Select Assign to me to assign the task to yourself.
- Task due date - select the date the task is to be completed by.
Once you have completed these fields, select Submit to move the item to the Action stage. The user assigned to the task will receive a notification. If you assigned the task to yourself the Submit button will change to Next and will take you directly to the next stage of the workflow.
Move to close
Choose this option to close the item or to escalate the item to another user to close.
- Assign to - select the staff member who is responsible for closing this type of issue. The person selected will be notified immediately and assigned the task to Close the item.
- Assign to me - select this box if you are the person responsible for closing this type of issue. The Submit button will change to Close.
- Further action taken (optional) - tick this box to add details of further action taken, that has not previously been recorded.
- Outcome - add details of final outcome. For example, 'Staff were informed of the positive feedback'. This information is important as it is displayed in various summary reports.
- Additional comments (optional) - tick this box to add additional comments.
Caution: Once the item has been closed, details relating to what action has been taken and any other comments cannot be edited.
Severity assessment (Complaints only)
Severity Assessment Code (SAC) is a numerical score to rate the severity of the event. The score is typically based on the consequence of that adverse event and also the likelihood of its recurrence.
Chose a SAC rating using the menu or the use the optional SAC rating matrix. Note: If it's likely that the adverse event could reoccur, you should consider implementing mitigation actions. To check that you've selected the most appropriate rating, click on the Guide.

Risk linkages
This component displays any related risks that the incident sub-category has been linked to. These linkages have been approved by the risk owners and can't be changed per individual incidents. You can, however, link the incident to an additional risk if relevant.

Complaints handling
This component only appears if the Feedback type is 'Complaint'.
In this component you can identify if the complaint has been supported as being valid (Upheld) and the key dates of correspondence with the complainant.

Identified issues and improvements
Click Add to list corrective actions that should be taken as a result of the event. Corrective actions should be coded as a 'non-conformance' in the Improvement type field. 
When you submit the entire incident report, the corrective actions and improvements created here will automatically appear in the Improvements register and be assigned to the relevant person to be managed.
Go to topAttach records
This component enables you to attach records relating to the issue such as correspondence, emails, or photographs. Only users with permissions to see the item will be able to see attached records.
Click Attach to add a record.

Record name
When naming the record ensure the description is meaningful. For example, 'Correspondence to client - final outcome - April 2022'.
File or Link
Click on Choose file and navigate to the record on your computer. If you have links enabled, toggle to change the control to add a URL to the record. The URL must be a in a web format (https://) or Microsoft Sharepoint format (https://<company>.sharepoint.com/...)
Submit or save
The green Submit button will save the form and in most cases progress the item to the next stage of the workflow. The button label will change depending on certain conditions to make it quicker to complete tasks. For example, if you assign the item to yourself to close, the button label will change to 'Close' allowing you to close the item without have to click through to another stage in the workflow.
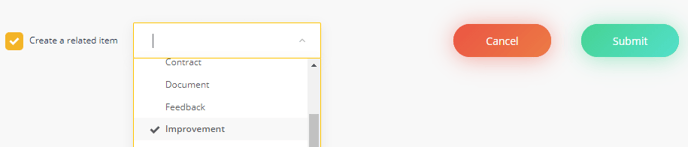
Select Create a related item if you want to create a separate linked item on another register when you save the form. A link between the two items will be displayed in each item's System event history.
Go to topSystem event history
A chronological record maintained by the system detailing entries and changes made to the form including links to any related items created by users.
Click the '+' control on the right to expand the line item to see more information.
