What is a risk?
A risk is being exposed to the possibility of experiencing loss, injury, or other negative circumstances. Risk management is the systematic application of management policies, procedures and practices to the tasks of communication, consultation, establishing the context, identifying, analysing, evaluating, treating, monitoring and reviewing risk.
Why manage risks in Logiqc?
Dealing with risk is part of governance and leadership, and is fundamental to how an organisation is managed at all levels.
The Risk register is integrated with other registers in the platform which enables you to build a holistic view of the identified risk, the controls in place to mitigate it, and any related adverse events that have been reported, such as incidents, complaints, and non-conformances.
The risk management workflow
When a new risk is added to the Risk register, it will move to the Risk manager and then to the Risk owner for checking and publishing. Learn more
Permissions required to add a risk
You will need the following permission to add a risk:
- Add risks (minimum licence type required - Action)
How to add a risk
Complete each section of the Risk details form highlighted below. Click the links to learn how to complete each section.
- Risk details
Describe and categorise the risk and set the review date. - Risk controls
Describe and link to the controls in place to mitigate the risk eg. policies and internal audits. - Risk assessment
Use the risk matrix to determine the controlled, target and uncontrolled risk ratings. - Risk treatment
Create and assign mitigation actions to improve the management of the risk. - Related adverse events
Link the risk to related incident and complaint categories for automatic tracking of related adverse events - Assign
Select the Risk manager and Risk owner. - Access control
Select the teams and/or individuals who should be able to view the risk. - Attach records
Upload any relevant records relating to the risk. - System event history
A chronological record maintained by the system detailing entries and changes made to the form including links to any related items created by users.
Risk details
In this component you'll describe and categorise the risk, and specify the date the risk is to be next reviewed.
Note: check the Draft tab of the Risk register for pre-populated examples of risks.

-
Risk dimension
Select the relevant dimension that the risk relates to. Risk dimension is the highest order categorisation of a risk. Examples include: Strategic and Operational. -
Risk category
Select the category that best defines the nature of the risk.
- Risk name
Enter the name or brief description of the risk eg. Disruption to essential services or Infection prevention and control.
- Contributing factors
Describe the factors that can lead to the risk occurring. - Description of the risk
Describe the risk in detail. - Potential consequences
Describe the outcome or impact to the organisation and its consumers and stakeholders in the event that the risk actually occurred. - Risk review date
Select the date the risk assessment and controls should be reviewed. Reviews should be conducted when significant changes occur in the organisation and/or on an annual basis. - Record physical location (optional)
Enter any relevant specific locations where the risk could occur eg. certain environmental hazards may be confined to where chemicals are stored. - Additional comments (optional)
Enter any relevant additional comments. Comments can be added over time and will display in the Action history of the risk in the Manage, Review and Close stages of the workflow .
Risk Controls
The Risk controls component displays the current risk controls your organisation has in place to manage the identified risk.
- Description of existing controls - describe the existing controls in place to manage the risk.
- Related controls - for each register activated in the QMS, a dropdown menu will appear enabling you to link the relevant controls from all other Registers eg documents, contracts, records, assets, audits, compliances, maintenance, training, licensing, and suppliers. Select from each dropdown the related control/s in place to manage the identified risk.

Risk assessment
Use the risk assessment matrix rate the risk from following three perspectives:
- Uncontrolled/Inherent risk - the initial assessment of the impact and likelihood of a risk prior to considering existing controls. This is sometimes referred to as the inherent risk.
- Controlled/Residual risk - the assessment of the impact and likelihood of a risk taking into account existing controls. This is sometimes referred to as residual risk. If adequate controls are in place to manage a risk it is expected that the controlled risk rating would be lower than the uncontrolled risk rating. Controls can include policies, procedures and internal audits or checks.
- Target risk rating - the level of risk the organisation would be comfortable with.
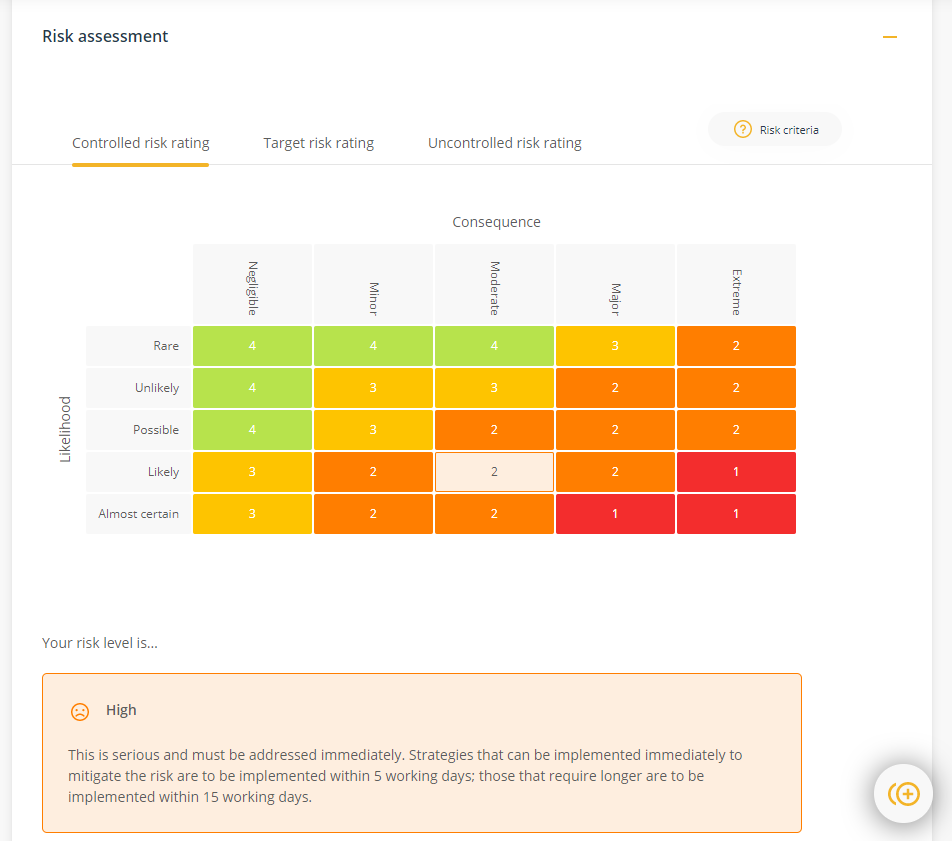
The Uncontrolled, Controlled and Target ratings are required values so they must be completed before saving the form.
Go to topRisk treatment (optional)
This component enables you to link current or past improvements that have been implemented to mitigate the risk as well as delegate new risk mitigation actions. Risk mitigation actions can be added at anytime.
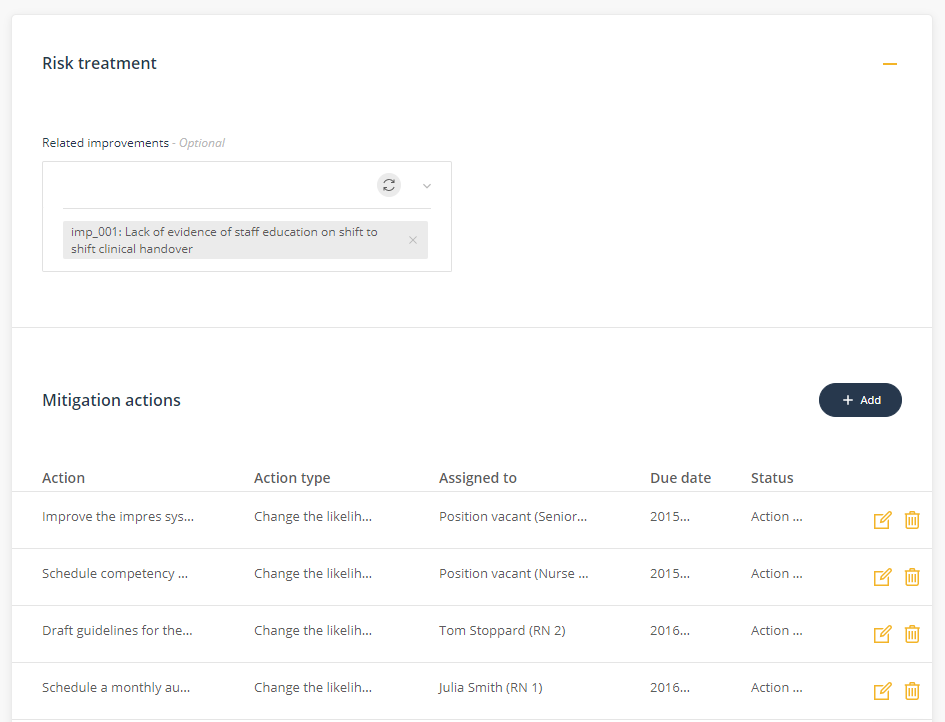
Mitigation actions (optional)
Click +Add icon to create and delegate a mitigation action. The person assigned will be notified that they have a task.

- Action
Describe the action to be taken. - Action type
Select the option that best describes the intended outcome of the action. eg. Change the consequences or Change the likelihood. - Assigned to
Select the person responsible for taking the action. - Due date
Select the date the action is to be completed by. - Status
Set the status to Action open (the default when initially assigning the mitigation action task) or Action ongoing. Only select Action complete if you are recording historical actions taken. - Click OK to save.
Each mitigation action task will appear in the Risk mitigation actions tab on the Risk register. They will also appear in My Tasks of the staff member assigned the risk mitigation action.
Go to topRelated adverse events
This component tracks the number of adverse events, linked to the risk, that have occurred. Incident and Feedback sub-categories used when reporting incidents or complaints can be linked to a risk and are displayed in this component when they are reported.
The review of a risk will be activated either by a nominated review date or if the value in the the Number of adverse events that can occur before the risk is automatically brought under review field has been exceeded, which ever occurs the first.
A tolerance level can also be set that will set the upper limit of events that your organisation will tolerate before the risk is escalated to the Risk manager. Improvements and Repairs reported in the platform that are manually linked to the risk will also be counted.
When the total number of related adverse events reaches your tolerance level, the risk will be brought under review and the risk manager will receive a task and be notified by email.

- Incident sub-categories linked to the risk (optional)
Select the incident sub-categories to be linked to the risk. Each time an incident of that type is reported, the count will increase by 1. - Feedback categories related to the risk (optional)
Select the feedback sub-categories to be linked to the risk. Each time a complaint of that type is reported, the count will increase by 1. - Number of adverse events that can occur before the risk is automatically brought under review
This component tracks the number of reported adverse events (incidents, complaints, non conformances, repairs) that have been linked to the risk. This is sometimes known as risk tolerance and can be described as The amount and type of risk an organisation is willing to accept in pursuit of its business objectives' (ISO 31000). When the number of reported events linked to the risk exceeds the set value the risk will come under review. - Number of adverse events to date
The number of incidents, feedback, repairs, improvements that have been linked to the risk for All time. - Number of adverse events since the risk was last reviewed
The number of incidents, feedback, repairs, improvements that have been linked to the risk since the risk was last reviewed. This is the number that will trigger the escalation and notification. It will be set back to zero each time the risk is re-approved following a review.
Assign
In this component you set responsibilities for managing and approving the risk. These choices should align with organisational delegations relating to the management of risk.

- Related business area
Select the business area/s the risk relates to. - Related meeting
Select the meeting that has oversight responsibility for the management of the risk. This is consistent with the premise that transparency in responsibility leads to greater accountability. - Risk manager
Select the staff member who is responsible for managing the risk. - Risk owner
Select the staff member who is accountable for the risk. If you are the Risk owner, the Quick publish option will be available for immediate publishing of the risk when you save the form. - Notify users by email (optional)
Use this function to notify relevant personnel that the risk has been added to the system. Note: users sent notifications relating to the risk will need to be included in Viewing permissions to see the risk.
Access control
Set which users will have access to view the risk. You can grant access to all users or specific teams and individual users.

All users can access
Select this option if you would like all users to be able to view the risk.
Specify who can access
Select this option to control which users can view the risk.
Teams
Select the team/s who need to view the risk.
Individual users
Select specific users (if they are not included in the selected team/s) who need to view the risk.
Who can view?
Click this button to see a list of users who can see the item based on your selection. The list will also include those users assigned to the item in the workflow. Note: Users with system level permissions to see all items will also be included.
Attach records
This component enables you to attach records relating to the risk. Only users with permissions to see the item will be able to see attached records.
Click Attach to add a record.

Record name
When naming the record ensure the description is meaningful.
File or Link
Click on Choose file and navigate to the record on your computer. If you have links enabled, toggle to change the control to add a URL to the record. The URL must be a in a web format (https://) or Microsoft Sharepoint format (https://<company>.sharepoint.com/...)
Go to topSubmit/save
The green Submit button will save the form and progress the item to the next stage of the workflow. The button label, however, will change depending on certain conditions to make it quicker to complete tasks.

- Quick publish - If you are the Risk owner, you can skip the Manage and Approve stages by selecting Quick publish. The Quick publish option will immediately approve the document and publish it to the Risk register.
- Submit/Next - The green Submit button will save the form and move it to the Manage stage.
- Create a related item - If you want to create a related/linked item you can select the relevant register in the Create a related item component. When you press Submit, the platform will launch a new item in the register you selected. The platform will display a link between the two items in the System event history.
System event history
The System event history is a chronological record maintained by the system detailing entries and changes made to the form including links to any related items created by users.
Click the '+' control on the right to expand the line item to see more information.
